Cheese Scones
March 30, 2009

When we think of scones it’s always teatime and there’s jam or honey and quite possibly cream. The sun is out. Bees hum in the roses and it’s all very Edwardian and English.
But there’s a whole other way of eating scones, where they’re a savoury item, to be eaten either on their own with butter, or with soup – best of all, to my taste, being sweetcorn soup.
These are they. The recipe has been handed down to me so I don’t know who was its original author. But the addition of the spring onions is mine, though you could use a leek.
Cheese Scones
at least 12
225g self raising flour
pinch salt
1/2 tsp mustard powder
55g butter
100ml milk
1 egg
50g cheddar cheese, grated
paprika
2 spring onions, finely chopped
Set the oven to 220C/425F/Gas 7. Grease an oven tin.
Sieve together the flour, salt and mustard powder. Rub in the butter.
Mix in half the cheese. Crack the egg into the middle of the flour and pour in most of the milk. Gradually work the ingredients together. Add the rest of the milk if it’s necessary, but aim for a soft dough which isn’t sticky.
Turn out the dough onto a floured surface and knead a little, before pressing it down to form a slab about 2cm thick. Cut into 5cm rounds.
Place the scones onto the baking sheet and brush with milk. Then top them with a little cheese and a sprinkling of paprika.
Bake for 10-12 minutes.

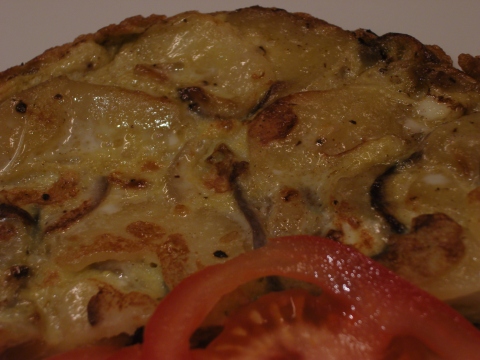
Spanish Omelette
March 26, 2009
Why make it?
1. It’s simplicity itself.
2.You can share it with someone you like.
3. It’s a good excuse to drink some red wine, probably Rioja.
4. After the wine, you can say tortilla de patatas in a bad Spanish accent with a silly lisp.
5. It comes from my favourite country in Europe.
Spanish Omelette (Tortilla de Patatas)
for 2
1 medium red onion
12 oz potatoes
3 tbs olive oil
1 clove garlic (not authentic, but good)
4 large eggs
Peel the onion, cut in half width-ways and slice thinly. Peel and slice the garlic. Peel the potato and cut into thin slices. The thinner they are the quicker they will cook.
Heat 2 tbs of the oil in a sturdy frying pan, about 10″ in diameter. Add the vegetables and turn down the heat. Season well. Cook covered for about 10 minutes, stirring every now and then. Breaking up the potatoes slightly with a wooden spoon is also good.
Crack the eggs into a basin and beat lightly. Season. When the potato mixture is done, add to the eggs.
Heat another tbs of oil in the pan, spoon in the tortilla mixture, cover and turn down the heat to the absolute minimum. Leave to cook for about 15 minutes.

To cook the top of the omelette, cover the pan with a plate, holding it there firmly, and invert so that the omelette lands on the plate. Then slide it back into the frying pan to cook for another couple of minutes.
Serve with salad. And wine of course.

The Honey Sandwich
March 18, 2009
Now that Marks and Spencer have unveiled their own jam sandwich, competitively priced at 75p, I feel certain that the time is ripe for an occasional series on my own favourite sandwiches.
The homemade sandwich is a very personal affair. Since most of us only admit to eating them when we have to – ie for lunch at work – owning up to actually liking them feels like a truly personal revelation. Particularly on a food blog, you know? It sounds kind of slummy. Like telling you that I don’t wear underwear.
But there it is. I do (like sandwiches that is).
And this is my latest favourite.

That’s butter (or Utterly Butterly to be perfectly exact) on granary bread. Plus a thick layer of set honey on one of the slices, and a thin layer of light Tahini on the other.
Tahini is made from sesame seeds and it adds a little chewiness, along with some protein and a rather larger number of calories.
It works, really it does. Try it. And then let me know your own favourite sandwiches.
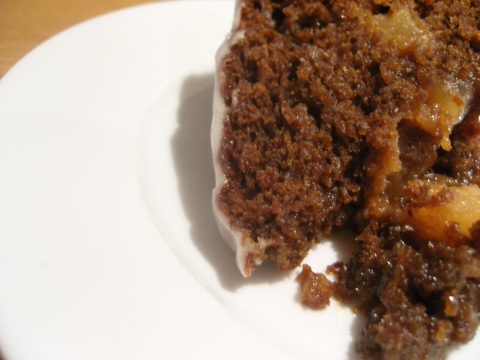
Sticky Pineapple Gingerbread
February 26, 2009

Gingerbread has to be one of my top ten tea-time favourites, particularly good for wintry days or during summer rain, when you need that glow of heat coupled with the kick of sugar.
It’s a comfort food, yes, but a strongly flavoured and sophisticated one. As a child I never really liked ginger in baking – it was too strange and not straightforwardly sweet enough. The ginger biscuits I was given then were a Polish variety, made by my grandmother and served as a traditional Christmas treat. They weren’t biscuits or cookies as we find them in supermarket packets: these were spongy in the middle and covered with white icing.
I can’t say I ever liked them. They were light, but yet not quite light enough for cake. They were called biscuits, but had no crunch. And where, I wondered, was the chocolate?
Perhaps that experience is why I now consider ginger in baking, to be adult food. It’s sensual. It’s aromatic and bold. It fills the kitchen with strong scents and tastes peppery and almost luridly spicy. The sweetness too, is punchy but unusual. It’s a layered effect, a symphony of sweetness if you like, built up by using not just treacle, but sometimes honey or golden syrup as well and then dark muscovado sugar on top of that.
And beware; this recipe is called ‘sticky’ for a reason, so no nonsense about eating this daintily, please. Napkins, or good old finger licking, will definitely be called for.
Sticky Pineapple Gingerbread
450g plain flour
1 tbs ground ginger
1 tbs baking powder
1 level tsp bicarbonate of soda
1 level tsp salt
200g dark muscovado sugar
175g butter
300g black treacle
1″ fresh ginger, peeled and finely grated (discard the leftover pulp)
300ml milk
1 egg
3 pieces stem ginger, finely chopped, plus about 3tbs syrup
432g can pineapple chunks, drained
6tbs icing sugar
Set the oven to 160C/325F/Gas 3. Grease a 23cm baking tin.
Sift together the baking powder, flour, ginger, bicarbonate of soda and salt.
Melt the butter and sugar with the treacle in a large pan over a low heat. Leave to cool and then beat in the egg and milk, and stir in half the chopped stem ginger. Add the grated fresh ginger. Fold the mixture in with the dry ingredients.
Pour the cake batter into the greased baking tin and scatter the pineapple pieces and the rest of the stem ginger over the top. Bake for about 1.5 hours. The cake should be well risen and a skewer or fork inserted in the middle should come out clean.
Leave for about half an hour in the tin and then turn out the cake and place on a wire rack to cool completely.
Finally, you need to ice the cake. Mix the icing sugar with the rest of the stem ginger syrup to make a soft gooey paste. Drizzle over the cake – zigzags look fantastic.
The cake will keep well in a cake tin and the flavours will even improve over several days.
Very Nice Recipe
February 20, 2009
Well here we are again. At least, here I am, and you are too, hopefully. In fact I’ve sat here 10 minutes and I still don’t know how to begin. Which is new to me.
I do have a recipe to share, no problems there. But how to present it so that you realise its true deliciousness? How not to put you off at the very first hurdle?
Its the name I’m worried about. I fear it will bring back memories from childhood of something pale and soggy, watery even, to be shunted to the side of the plate when nobody’s looking and hidden under a lettuce leaf.
So maybe I’ll write about something completely different. How ab0ut Nightime in London. Did you know that it isn’t the ever-present roar of traffic that keeps me awake at night? It isn’t the wail of police sirens every two minutes or the raucous laughter of urban youth.
It’s animals.
Actually the grunts and shrieks are positively blood-curdling. I thought someone was dying last night. The same mad cry over and over for about 10 minutes. And y0u know what it was? Foxes, mating.
London is completely overrun with them. And that’s not to mention the owl with his torpedo of a hoot and the little unknown animals who rustle through the undergrowth and squeal incessantly.
Maybe they’re about to be eaten.
Which reminds me, in a rather unpleasant and unvegetarian way, that I’m actually here to tell you a recipe.
Oh alright then, here goes. It’s Cauliflower Cheese.
There, I’ve done it. You still here? If you bear with me, I’ll try and explain why this version is nothing like the insipid morass you ate all those years ago.
For a start it doesn’t have cauliflower in it, but broccoli and potatoes. (And it could have slices of celeriac in it, was going to in fact, but I couldn’t find any in the local shops).
Secondly it’s not bland, but rich and tangy in a mature-cheddar kind of way.
And it’s simple. Just lightly cooked vegetables inundated with a creamy cheesy sauce, topped with more cheese and breadcrumbs and bunged in the oven for 25 minutes.
In fact the only possible stumbling block, as far as I can foresee, is the calorie count. There sure is a load of cream in here! Then again, you don’t get a meal this rich, sticky and crisp on the top and warmly succulent in the middle, without adding a millimetre or so to your waistline.
Broccoli and Potato Gratin
for 4
500g potatoes, scrubbed and cut into chunks
250g broccoli florets
50g butter
50g plain flour
salt
400ml milk
150ml cream
150g grated cheddar – or Parmesan
25g oats
Set the oven to 180C/350F/Gas4.
Parboil the potatoes for 5 minutes, add the broccoli and simmer until just cooked: 8-10 more minutes. Drain well.
In a medium saucepan melt the butter, stir in the flour and heat for a minute. Then, ever so slowly, add in the milk, little by little to avoid any lumps. Gradually bring to the boil, by which time the sauce will have thickened. Mix in the cream, half the cheese and some salt.
Half the sauce goes into a 2 litre oven dish, dollop in the vegetables and pour the rest of the sauce over the top. Scatter on the remaining cheese and the breadcrumbs and cook for 25 minutes, or until the top of the gratin is golden-brown.
